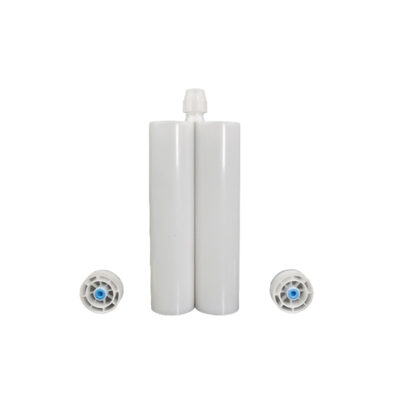
In two-part adhesive dispensing, the most common problems include uneven mixing, unstable output, clogging, leakage, and premature curing. These failures are usually related to material condition, cartridge-to-mixer matching, pressure settings, storage conditions, or component wear.
This guide focuses on how to identify, diagnose, and resolve these specific failures. By following the structured troubleshooting steps below, you can minimize downtime and ensure consistent bond quality. If you first need to confirm cartridge formats, ratios, or compatible dispensing configurations, see our dual-cartridge product page.
Uneven Mixing of Two-Component Adhesive
Signs of Uneven Mixing
The dispensed adhesive bead shows distinct, unmixed streaks of two colors.
Within a single bond line, some areas cure while others remain liquid or tacky.
Across a batch, some units cure fully, while others do not cure at all.
Possible Causes of Uneven Mixing
Static mixing nozzle Issues: Using a mixer with too few elements for the material’s viscosity, or using a damaged mixer with broken internal elements.
Material Issues: The resin or hardener has undergone sedimentation (filler settled at the bottom) or has been stored at extreme temperatures, altering its viscosity and reactivity.
Ratio Errors: The dispensing system is delivering the two components in an incorrect ratio due to a mismatch between the cartridge size and the dispensing gun or equipment.
How to Check for Mixing Problems
Check the First Dispense: Dispense a small amount into a cup. If the first few centimeters are unmixed, the mixer may simply not be fully primed yet. If mixing remains inconsistent, the mixer may be damaged or incorrect for the application.
Manual Mix Test: Extract a small, equal amount of both components from the cartridge and mix them thoroughly by hand. If this sample cures correctly, the problem is with the mixing tube or the dispensing equipment. If it does not cure, the material batch may be defective or improperly stored.
Verify Cartridge Ratio: Confirm that the dual cartridge’s volume ratio (e.g., 1:1, 2:1, 10:1) matches the dispensing setup and that the cartridge is correctly seated and engaged.
How to Fix Uneven Mixing
Replace the static mixer with the correct model, ensuring the number of elements is suitable for the adhesive’s viscosity.
If sedimentation is suspected, replace the cartridge with a fresh, properly stored one. For fillable systems prepared from bulk materials, follow the material supplier’s mixing and loading instructions before cartridge filling.
If the ratio is incorrect, check the cartridge seating and the dispensing equipment’s mechanical drive to ensure proper engagement.
Unstable Dispensing Output
Signs of Unstable Dispensing Output
The volume of adhesive dispensed varies randomly from one cycle to the next.
Some dispense points receive no adhesive or contain air bubbles.
Over a long production run, the dispensed volume gradually decreases, leading to incomplete dots or beads.
Possible Causes of Output Instability
Throttling Effect from static mixer: The internal mixing elements create multiple pressure drops. This can cause a delay at the start of a cycle (under-fill) and a drip or tail after the cycle ends.
Filler Sedimentation: Dense filler particles settle in the cartridge during storage. At the start, the adhesive is thinner and flows faster. Near the end, it is thicker and more filler-rich, reducing flow rate under the same pressure.
Outlet Restriction: A partially clogged dispensing tip or mixer outlet creates variable back-pressure.
Material Temperature Variation: As the adhesive warms up during operation, its viscosity drops, which can cause the output volume to increase over time.
How to Check Output Fluctuation
Observe Flow at Start vs. End: Compare the dispensed volume of the first few shots against the last few shots from the same cartridge. A significant drop suggests filler sedimentation.
Check for Tailing: If a small amount of adhesive continues to flow after the valve closes, the pressure in the static mixing nozzle is not dissipating quickly enough, indicating a strong throttling effect.
Inspect the Tip: Look for any dried adhesive or debris at the outlet of the dispensing tip or mixer.
How to Fix Unstable Dispensing
Change the mixing nozzle if Needed: If the throttling effect is causing inconsistent starts and tails, consider a mixer with a shorter length or a more open internal geometry to reduce back-pressure.
Prevent Sedimentation: Store cartridges according to the material manufacturer’s recommendations and avoid prolonged storage conditions that promote filler sedimentation. If sedimentation is severe, replace the cartridge and review storage and material-handling practices.
Control Temperature: Maintain a stable ambient temperature in the production area. For long runs, avoid excessive heat buildup from equipment that could warm the adhesive cartridge.
Leakage, Clogging, or Premature Curing
Signs of Leakage, Clogging, or Premature Curing
Adhesive leaks from the connection point between the cartridge and the mixing nozzle.
Material seeps past the plunger at the back of the cartridge.
The mixer becomes hard and blocked before the end of a production shift.
The dispensing tip clogs intermittently.
Common Causes of Leakage, Clogging, or Premature Curing
Connector Mismatch or Wear: The static mixing nozzle’s interface does not match the cartridge outlet. The sealing gasket inside the cartridge port or on the mixer may be missing, damaged, or worn.
Excessive System Pressure: Pressure is too high, forcing material past the plunger seal. This can be caused by a clogged tip, a mixer with too many elements, or incorrect pressure settings on the dispensing equipment.
Excessive Dwell Time: The adhesive’s pot life is exceeded while the material is static inside the mixer, causing it to cure and block the flow path.
Worn Plunger Seal: Over time, the seal at the back of the cartridge can wear out, especially if used with high-viscosity materials or under high pressure.
How to Check Seals, Connectors, and Pressure Settings
Inspect the Connection Point: Check for a missing or damaged gasket. Ensure the mixing nozzle is fully tightened to the stop, not just hand-tight.
Check for Cured Residue: If the mixer is hard and blocked, note how long the material was left idle. If leakage is present at the plunger, inspect the seal for visible wear or deformation.
Verify Pressure: Review the dispensing pressure or actuation force and ensure it is within the cartridge manufacturer’s recommended limits.
How to Fix Leakage, Clogging, or Premature Curing
Replace Seals and Mixers: Install a new, undamaged mixing nozzle and ensure the gasket is present. If the plunger seal is worn, replace the cartridge or the seal component if it is serviceable.
Reduce Dwell Time: If the mixer is curing during short breaks, switch to a material with a longer pot life or replace the mixer after any significant pause in production.
Lower Operating Pressure: Reduce the input pressure to the dispensing gun. If the flow rate is insufficient at a lower pressure, address the source of resistance (e.g., a clogged tip or overly restrictive mixer) rather than simply increasing pressure.
Storage and Handling Mistakes
Signs of Storage and Handling Problems
The adhesive fails to cure properly or shows uneven mixing performance.
Dispensing output becomes unstable over time.
Leakage or ratio errors occur during operation.
The static mixer clogs unexpectedly or shows contamination.
Common Storage and Handling Mistakes
Extreme Temperatures: Storage in freezing conditions can cause crystallization or phase separation, while high temperatures accelerate material aging, reducing pot life and causing premature curing.
Prolonged Storage Without Rotation: Long-term storage leads to filler sedimentation, resulting in inconsistent flow and curing behavior.
Incorrect Cartridge Installation: Forcing a cartridge into incompatible equipment can damage the plunger seal or cartridge body, leading to leakage and incorrect ratio output.
Reusing Old mixing nozzles: Previously used mixers contain cured or partially cured adhesive, introducing contamination and increasing the risk of blockage.
How to Check for Storage-Related Problems
Review storage conditions and confirm whether cartridges have been exposed to extreme temperatures.
Inspect the cartridge for visible sedimentation, separation, or abnormal appearance.
Check whether the cartridge is correctly matched with the dispensing gun in terms of size and ratio.
Examine the mixing nozzle for any cured residue or signs of prior use.
How to Prevent Storage and Handling Failures
Follow the material manufacturer’s recommended storage temperature guidelines.
Implement a first-in, first-out (FIFO) inventory system to minimize prolonged storage.
Inspect cartridges before installation for damage, deformation, or leakage.
Always use a new, clean mixing nozzle for each new cartridge or after extended downtime.
When to Replace a Cartridge, Static mixing nozzle, or Sealing Component
Proactive replacement is key to preventing failures. Replace components when you observe the following signals:
When to Replace a static mixing nozzle
The adhesive is not mixing evenly, even after priming.
Flow resistance has become noticeably higher than when the mixer was new.
Cured adhesive is visible inside the mixer inlet or outlet.
The mixer has been left idle for longer than the material’s pot life.
When to Replace a Dual Cartridge
The plunger seal shows visible wear, cracks, or is leaking.
The dual cartridge body is cracked, dented, or deformed.
A cartridge shows clear signs of sedimentation (a hard layer at the bottom) or separation.
The cartridge has been stored beyond its shelf life.
When to Replace a Sealing Component
The gasket at the cartridge outlet or mixer inlet is missing, brittle, or deformed.
Adhesive consistently leaks from the connection point, even after tightening.
Conclusion
Most troubleshooting scenarios in two-part adhesive dispensing can be systematically addressed by focusing on four key areas: material state, component matching (cartridge to mixing nozzle), pressure control, and component wear. When a problem like uneven mixing or unstable output occurs, start by checking the mixer and the material batch. For leaks or clogs, inspect seals, connectors, and system pressure.
If the issue persists after these checks, consider replacing the mixer or the adhesive cartridge with a fresh, properly stored unit. For reference on compatible cartridge formats and dual-cartridge dispensing setups, please visit our dual-cartridge page.
FAQs about Two-Part Dispensing
Why is my adhesive cartridge clogging?
Clogging is usually caused by material curing inside the mixing nozzle due to excessive downtime, or by using a mixer with too many internal elements that create excessive back-pressure. It can also occur if the dispensing tip is too fine for the adhesive’s filler content.
How do I know if the mixing nozzle is the problem?
Replace the mixer with a new one. If the mixing quality improves or the flow returns to normal, the original mixer was the issue. If the problem persists, the cause is likely the material or the dispensing equipment.
Why is the adhesive not mixing evenly?
Uneven mixing is often due to a damaged or incorrect mixing nozzle, a ratio error from a cartridge and gun mismatch, or material issues like sedimentation or improper storage. A manual mix test can help isolate the cause.
Can storage conditions affect dispensing performance?
Yes, significantly. Cold storage can increase viscosity and cause curing issues. Hot storage can shorten pot life and lead to premature curing in the mixer. Prolonged storage can also cause filler sedimentation, leading to unstable output.
When should I replace a dispensing cartridge or mixing nozzle?
Replace a mixing nozzle when mixing is uneven, resistance increases, or it has been idle beyond the material’s pot life. Replace a cartridge if the plunger seal leaks, the body is damaged, or the material shows signs of separation or has exceeded its shelf life.