This guide walks you through the correct operating procedure for a two-component manual caulking gun. The core steps are confirming cartridge ratio and mixer compatibility, loading the cartridge, attaching the static mixer, purging before dispensing, maintaining consistent output, and handling pauses and shutdown correctly. If you follow these steps in order, you are much less likely to run into common mixing, ratio, or dispensing failures.
Step 1 – Confirm the Cartridge, Ratio, and Mixer

Before you load the gun, verify the following three things:
- Cartridge ratio matches the gun: Two-component cartridges commonly come in ratios such as 1:1, 2:1, and 4:1. You should always confirm that the gun is designed for the ratio of the cartridge you are using. If the ratio does not match, the two components will not be metered correctly, even if the gun and cartridge appear to fit together.
- Mixer matches the cartridge: You should confirm that the static mixing nozzle is specified for your cartridge size and ratio. A mismatched mixer may still attach physically, but you should not assume it will produce complete mixing.
- Cartridge and mixer are undamaged: Before you begin, check both components for visible cracks, deformation, or blocked outlets. A damaged cartridge outlet or a pre-clogged mixer should be replaced before use.
Always refer to the material datasheet for the correct cartridge ratio and compatible mixer specifications. Do not rely on visual similarity between components.
Step 2 – Load the Cartridge into the Manual Gun
Follow this sequence so you can seat the cartridge correctly and avoid early ratio errors:
Advance the push rod slowly until the plunger tips engage with the grooves on the cartridge pistons. Before you continue, confirm that both sides are in contact. If one side is not engaged properly, ratio errors can begin immediately.
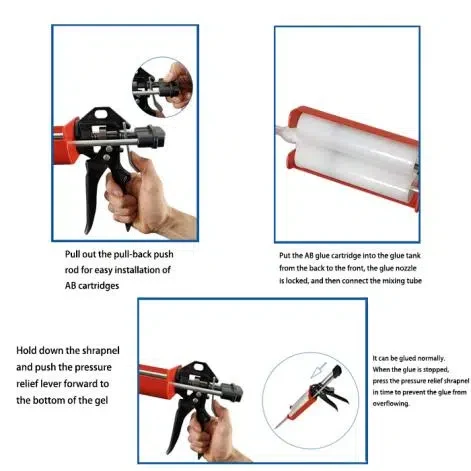
Press the metal release tab at the front-bottom of the gun with your thumb while pulling the push rod fully back with your other hand.
Insert the front end of the cartridge into the gun’s front opening first, then lower the rear of the cartridge into the gun body.
Push the retaining clip until it sits flush with the surrounding surface. This locks the cartridge in place.
Step 3 – Attach the Static Mixer
- Remove the protective cap from the cartridge outlet. After removing the cap, do not touch or contaminate the outlet openings.
- Align the mixer inlet with the cartridge outlet. Depending on the design, the mixer attaches by twisting to lock or pressing until it clicks into position. You should follow the locking mechanism required by your cartridge model.
- Confirm that the connection is fully seated and does not shift when light lateral pressure is applied. If the mixer connection is loose, you are likely to see leakage, unstable flow, or ratio deviation during dispensing.
Step 4 – Purge Before Dispensing
Purging is a required step before every dispensing session. Even if the gun appears ready, you should not skip it.
Why purge:
When you first load the cartridge and attach the mixer, air is still trapped ahead of the pistons, and the two components have not yet entered the mixer channel simultaneously. The first material to exit the mixer will not be properly combined — even if the gun appears to be dispensing normally.
How to purge:
- Squeeze the trigger slowly and steadily so the push rod advances in a controlled way. Direct the mixer tip toward a waste surface or disposal container.
- Continue dispensing until the material exiting the mixer shows a fully uniform color — no streaking, no marbling, and no visible separation between the two components.
- Discard all material dispensed during the purge. You should treat this initial output as unreliable and keep it out of the actual application.
If the purge output remains streaky or shows one component running significantly ahead of the other, stop immediately. This indicates either incorrect cartridge seating, a mismatched mixer, or a damaged cartridge piston.
Step 5 – Dispense the Material Correctly
Once the purge is complete and the material is mixing evenly, begin the application:
- Maintain steady trigger pressure: You should apply consistent, even force on the trigger throughout each pass. Inconsistent pressure causes variations in material output volume and mixing ratio.
- Move at a consistent pace: You should move the gun at a uniform speed relative to the dispensing rate. Slowing down while maintaining trigger pressure results in over-application; speeding up without adjusting causes gaps.
- Dispense continuously where possible: If you pause unnecessarily in the middle of the application, the material inside the mixer becomes more likely to begin curing before you finish the pass.
- After stopping, release the pressure: When you pause, pull the push rod back slightly using the release mechanism to relieve cartridge pressure. This reduces post-release drip.
Step 6 – Handle Pauses and Shutdown Correctly
Short pause (within the material’s pot life):
If you stop dispensing but plan to resume within the material’s working time, you can usually leave the mixer attached for that short pause. Before you resume, dispense a small amount and confirm that the color is uniform before applying material to the workpiece.
Extended pause or end-of-session:
Remove the static mixer immediately when the session ends or when the pause will exceed the material’s working time. Leaving a used mixer attached allows the mixed material inside to cure, which can block the cartridge outlet and make the cartridge unusable.
- You should replace the mixer with a fresh one before each new dispensing session after an extended pause.
- You can usually reuse the cartridge in later sessions as long as the two components remain separated and the cartridge pistons are not damaged. Recap the cartridge outlet after removing the mixer to protect it from contamination.
- When restarting after a pause, treat the first dispense as a new purge — discard the initial output until uniform mixing is confirmed.
- Never attempt to force a push rod through a mixer that has cured material inside. This can rupture the cartridge or damage the gun mechanism.
Common Mistakes When Using a Two-Component Manual Caulking Gun
These are the most frequent errors that cause dispensing failures, ratio deviations, or equipment damage:
Ratio mismatch between gun and cartridge
Using a 1:1 gun with a 2:1 cartridge (or any non-matching combination) will meter the wrong volume from each barrel. The mixed material will have an incorrect stoichiometric ratio, leading to incomplete curing or adhesion failure. Before you load the cartridge, always verify that the gun is rated for the specific ratio you are about to use.
Using the wrong static mixer
A static mixer that is not specified for the cartridge size and ratio will not produce complete mixing, even if it physically attaches. Mixing element count and geometry are matched to specific flow rates and ratios. If you use a mismatched mixer, uneven cure is one of the most likely results.
Skipping the initial purge
Beginning the application without purging means the first portion of material used has not passed through the full mixer channel simultaneously with both components. This material will have an off-ratio composition and unpredictable cure behavior. In practice, purge is not optional.
Cartridge not seated correctly in the gun
If the push rod plungers are not properly engaged with both cartridge pistons — or if one side is slightly misaligned — the two components will not advance at the same rate. This produces a progressive ratio drift during dispensing that is not visible but directly affects material performance. If you notice uneven dispensing resistance, you should stop, retract the push rod, and reseat the cartridge before continuing.
Forcing a cured or partially cured mixer
If a mixer is left attached beyond the material’s pot life, the mixed material inside it will gel or cure. Applying force to push through a cured mixer does not clear the blockage — it builds pressure in the cartridge and can cause the cartridge barrel or piston to rupture. Remove and replace the mixer. You should never try to force it clear.
Pausing too long without replacing the mixer
Even if the cartridge itself is fine, mixed material left inside an attached static mixer will begin to cure as soon as the two components make contact. The working time of the mixed material — not the pot life of the unmixed components — is the relevant timeframe. If your pause exceeds this window, replace the mixer before you resume dispensing.
FAQ
Why is the material not mixing evenly at the start?
If you skipped the purge step or did not purge enough material, uneven mixing at the start of dispensing is normal. Both components need to fully enter the mixer channel before consistent mixing begins. Dispense and discard material until the output color is fully uniform before using it on the workpiece. If streaking continues beyond the initial purge, check that the cartridge is seated correctly and that the static mixer matches the cartridge specification.
What should I do if I stop longer than the material’s working time?
Remove the static mixer immediately. The material inside the mixer will have cured or begun to cure — do not attempt to dispense through it. Attach a new static mixer, then purge until the output is uniform before you resume the application. The material remaining in the cartridge barrels is still usable because the two components have been kept separate.
Why does material continue to flow after releasing the trigger?
Post-release flow is caused by residual pressure inside the cartridge. The act of dispensing compresses the material and builds internal pressure, which continues to push material out briefly after trigger pressure is released. If you use the gun’s push rod release mechanism after each pass — pulling the rod back slightly — this reduces the effect by relieving cartridge pressure.
What happens if the cartridge is not seated correctly?
An improperly seated cartridge causes one of two problems: the push rod plungers may only engage one piston, advancing only one component; or the pistons advance at different rates, producing a ratio error that increases over the dispensing session. In either case, the mixed material will have incorrect composition. If you notice uneven dispensing resistance or inconsistent output color, stop, retract the push rod, and reseat the cartridge.
When should I replace the static mixer during use?
You should replace the static mixer when: (1) the pause has exceeded the working time of the mixed material; (2) dispensing resistance increases noticeably, indicating partial curing inside the mixer; (3) the output quality becomes inconsistent or streaky despite correct cartridge seating. Each new dispensing session after a significant pause should start with a fresh mixer and a new purge.
Conclusion
If you want consistent results from a two-component manual caulking gun, focus on five basic practices every time you use it: confirm cartridge ratio and mixer compatibility before loading, seat the cartridge so both pistons engage evenly, complete a full purge before every application, maintain steady dispensing pressure, and replace the static mixer whenever a pause exceeds the material’s working time.
If you need more information on compatible hardware, you can also review the dual cartridge gun and static mixer product pages.